Author Archives: admin

Dash Plaque Display Board

I’ve collected a number of dash plaques and was wondering what to do with them all. I did some quick research online and found that people either put them on their dash, threw them out, gave them away, stored them in a shoe box, or made some kind of display for them. I decided to mount them so that I could either show them with my car or hang them on the wall.

First I went to Target and purchased a poster frame. The one i bought was 18″ x 24″ and was less than $10. I probably should have picked a larger one but I didn’t want to invest a lot of money in case it didn’t work out. I also purchased some Scotch permanent mounting squares to mount the plaques to the frame. Several of the plaques already had double sided sticky tape on them but I used the mounting squares so the plaques would all be the same distance off of the board when mounted. In afterthought it may have looked interesting if the mounting depths had varied.

This is the poster frame I bought.

Poster Frame from Target

These are the mounting squares I bought.

Scotch Permanent Mounting Squares

The next step, arranging the plaques on the poster frame, was the most time consuming (at least for me). Before I mounted the plaques permanently, I laid them out on the frame so I could move them around and arranged them how I wanted. This took me quite a while before I found an arrangement that made me happy and was pleasing to the eye (at least in my opinion).

I started out arranging the plaques in chronological order. This left a lot of empty spaces. I moved the plaques around to make them fit better but still keeping the years together. This let me fit more of the plaques on the board, but there was still wasted space and leftover plaques. I decided to try arranging the plaques by car show. This let me fit most of my plaques on the board, but it looked unbalanced to me as all the large plaques were grouped together and all the smaller plaques were also grouped together.

The final arrangement I ended up with was to place the plaques randomly, trying to keep the years somewhat together and to not place plaques from the same show next to each other. This made for a more balanced looking arrangement and gave me the flexibility I needed to fit most of my plaques on one frame. I used the mounting squares to attach the plaques in the arrangement i had laid out. I had two very large plaques left over, so I saved them for my next frame after I collect more plaques.

This the arrangement I ended up with.
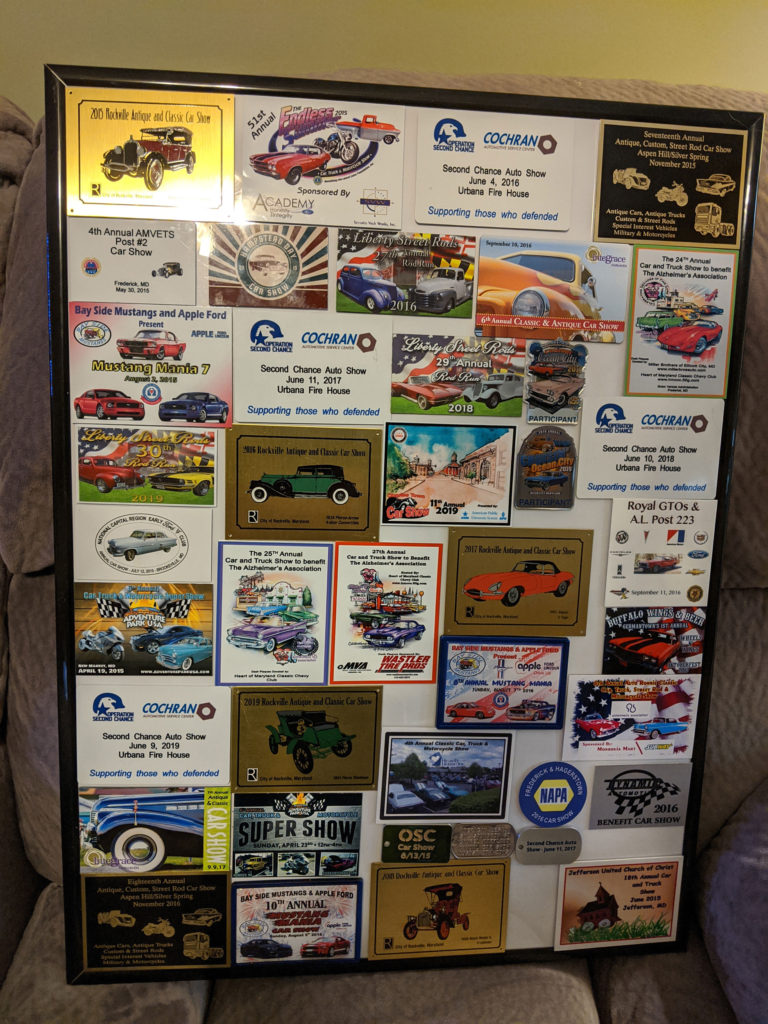
Picture of mounted dash plaques
Dash Plaques

Winter Projects 2019-2020

The car was reliable all season, even making the trip to Ocean City, MD and back. While we were there it was our only means of transportation. It got me back and forth to several other shows, and did a small parking lot “acceleration demo” for another car enthusiast. With that said, my only real complaints are a small squeak in the front suspension, the front bumper isn’t perfectly aligned, and there is a tiny dent on the right hand side front fender from some PVC tubing that fell over in my garage. None of these “issues” are very high priority, and I could probably get by without doing any winter projects beyond normal maintenance.

My ideas for potential winter projects are:

  • Rebuild front suspension. This isn’t really necessary as everything is tight and the alignment is still good. Seems like overkill to fix a small squeak. However it would give me the opportunity to add some upgrades, such as solid strut rods, roller bearing idler arm, roller bearing lower control arms, and possibly a Monte Carlo bar.
  • Remove and align the front bumper. Most people don;t even notice the small misalignment of the bumper, but it still bothers me. A fair bit of work for a small reward. But I probably will still fix it.
  • Paint less dent repair for the passenger side fender. I would have to hire somebody to do this for me.
  • Polish/buff the exterior paint. I may attempt to do this myself as I have the equipment. But I may choose to hire a professional if I’m not satisfied with the results of my attempt. If I hire a professional detailer I will have them do the interior and exterior, as well as the engine compartment.
  • Replace the exhaust tips with larger diameter ones. The current exhaust necks down from 2.25 inches to 1.875 inches just before the exhaust tips. I could modify the existing exhaust to keep a consistent 2.25 inch diameter all the way to the exhaust tips.

I’m not certain how much of this list I will tackle this winter. I don’t need to do any of these items. It all depends on my motivation and more importantly on my health.

Minor Maintenance

I usually refrain from making repairs during the driving/show season, but there were a few nagging issues that were bugging me. I felt that the repairs would be minor so I didn’t believe that I was risking disabling the car and missing out on driving time. There were 3 issues I wanted to address.

Issue 1: The clutch pedal was not returning all the way after depressing it. I noticed this during the Spring 2019 boardwalk parade in Ocean City. If I nudged the pedal from behind it would come the rest of the way back up. I wasn’t sure this would be an easy fix, so I did some research into roller bearing conversions for the clutch support. This conversion goes beyond what I would do during the driving season, so I would be required to make the repair as a part of my Winter maintenance. But before I plunged into the deep end I decided to try some white lithium grease on the under dash linkage. I stuck my head under the dash and gave a few sprays onto the linkage. That freed everything right up and the clutch pedal works fine now. Issue #1 handled.

Issue #2: The engine ran well but seemed to be using more oil than I would like. After a while the idle got a bit rougher as well and I could see some smoke under hard acceleration. I wondered if the engine might be sucking in oil through the PCV valve. I pulled the PCV valve and checked it in the only way I knew. I shook it to make sure it rattled, which it did. Then I looked into the grommet in the valve cover to see the condition of the baffle that prevents the PCV from sucking in oil. There was no baffle in my valve cover. I did some quick research and found a replacement grommet that is supposed to prevent oil from entering the PCV valve. I ordered the grommet and installed it. My other option was to replace the valve covers with a pair that has a baffle. This is the proper long term fix. But in the short term the new grommet appears to be helping. I need to keep track of my oil levels and make sure that was the problem. Hopefully Issue #2 is addressed, even if it is only temporary.

Issue #3: The belt line weather stripping on both doors was lifting at the ends. There are supposed to be screws at the ends holding then down, but my replacement weatherstrip didn’t have screw holes so I never installed the screws. I got out my drill, made the holes, and installed the screws. Issue #3 fixed.

Hopefully that handles the minor issues until this winter. Now back to driving and car shows.

Ride of the Month

I joined the Vintage Mustang Forums in 01/2014 to help me find information about repairing my Mustang. This forum turned out to be a wealth of information as it had many extremely experienced members who have restored and repaired many cars. I was mostly a lurker, using the site as a great resource. Occasionally I would make a post if I felt I had something useful to contribute.

On 3/22/2019 I was contacted by one of the moderators who wanted to know if I would like to have my car chosen as the ride of the month. Would I? You better believe I would!

I had to spend some time writing up the story of my car and attaching pictures. This wasn’t easy as I had 45 years of information to cover in only a few paragraphs. Still, I was able to put together a document, with pictures, to be posted on the forum. After the story is posted I’ll add a link to it in this posting.

Update: I was contacted by a site administrator for the VMF. He said my car was selected as the May 2019 ride of the month. I’ll post a link sometime in May after the VMF site is updated.

Update #2: Here is a link to the posting. https://forums.vintage-mustang.com/ride-month-winners/1156796-congratulations-sdcohe.html

DIY Throttle Linkage

One small nagging issue I had was that the replacement Holley carburetor I was using didn’t have the same attachment point for the throttle linkage. This prevented me from using the original clip that Ford used to attach the throttle linkage to the carburetor. I had managed to come up with something using a spring clip that was holding together fairly well. I had used this same solution in the past, and it eventually came loose after quite a bit of driving. I always had this fear in the back of my mind that this clip would come off just like the old one had. I knew that I couldn’t be the first person to run into this throttle linkage attachment problem. So I did some research on the Internet.

I learned that I definitely wasn’t the first person to have this issue. I also found a very clever DIY solution that looked nice, was easy to build, and used common and inexpensive parts. This is the link to the article I found. https://www.fordmuscle.com/archives/2004/08/ThrottleLinkage/index.php

I took some measurements, looked at online parts catalogs from my local hardware stores, and placed an order for the required parts. Once the parts arrived, I made some more measurements and did some cutting with a hacksaw. I also purchased a new throttle return spring and bracket since the spring I was using was the original 50 year old part. I had to do some bending to get the throttle return spring bracket to clear the new throttle linkage.

I feel that this DIY solution works well and has a professional look to it. I haven’t had much of an opportunity to drive the car with the new linkage. The only thing I can say at this point in time is that the new return spring is lighter than the original and I tend to step on the throttle harder than I need to. Hopefully I can avoid getting any speeding tickets until I adjust to the more sensitive throttle.